| Yoga The Basic Hatha Yoga Postures Used Ideally Before Meditation
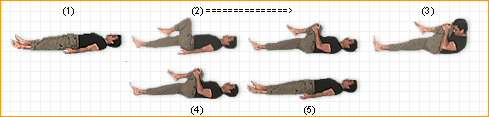
Do Each Posture Once Warm ups for Yoga Massage to move the blood. Start by massaging at the head and slowly bring hands to heart. Start on one hand over the arm to heart. Similarly from feet over the leg to the heart. From the back to the heart. Rolling side-to-side Grab knees while lying on back. Roll all the way to one side and end in that direction with head turned back the opposite way. The Program above is the very basic - rolling. At its conclusion stay on your back and do bicycling with legs. Now do the Bow Pose and rock back and forth like the pictures below. Now go to seated position. Sit on your heels. Raise to your knees, sit back on heels. Do this 3 times. The Wind-Relieving Pose: Pavana-mukta-asana 
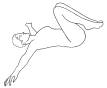
 - Lie flat on the back in the shava-asana.
- Inhale and bend the right knee and pull it close to the torso with both hands while interlocking the fingers just below the knee. Keep the left leg flat on the floor.
- Hold the inhaled breath for a few seconds then exhale slowly through the nostrils and lift the back, shoulders and head off the floor and touch the knee with the forehead.
- Hold the exhaled breath for a few seconds then slowly inhale and return the back, shoulders and head to the floor. Remain holding the knee.
- Hold the inhaled breath for a few seconds then exhale while bringing the right leg to the floor.
- Lie flat on the back in the shava-asana for a few seconds then repeat beginning with the left leg.
Comments: As mentioned above, practicing the purvana-mukta-asana will help to release gastrointestinal gas. It is also improves other gastrointestinal problems like upset stomachs and constipation by stimulating the abdominal region. Durations/Repetitions: Hold each of the four parts of this posture (corresponding with the held breaths) for three to five seconds each. Repeat the purvasa-mukta-asana three to five times on each side.
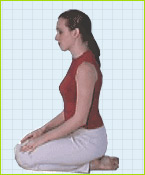 | The Adept Pose : Siddha - asana Siddha-asana - The Accomplished Pose Press firmly the heel of the left foot against the perineum, and the right heel above the genitals. With the chin pressing on the chest, one should sit calmly, having restrained the senses, and gaze steadily on the space between the eyebrows. This is called the Siddha-asana, the opener of the door of freedom. |
- Begin in a seated posture. Bend the left knee and grasp the left foot with both hands and place the heel against the perineum and the sole of the foot against the inside of the right thigh.
- Exhale and reach down and loop the forefinger of the right hand around the big toe of the right foot and grasp the left foot with the left hand.
- Bend the right knee, grasp the right foot with both hands and place the outside edge of the right foot where the calf and thigh of the left leg meet, right ankle over left ankle. The heel of the right foot should line up approximately with the navel and be as close to the pubic area as possible.
- With palms up, place the hands on the knees, form a circle with the thumb and forefinger and extend the remaining fingers straight ahead.
Comments: The siddha-asana is complicated to describe but is actually one of the simpler sitting postures. It requires less flexibility of the legs than the padma-asana yet it facilitates relaxation, concentration and ultimately, meditation. Siddha-asana helps to establish an equilibrium throughout the body/mind. It will also help stretch the legs and pelvic area to the point where the padma-asana can be held effortlessly. Either posture, by creating a firm foundation with the legs locked in a crossed position and the spine held straight and motionless, awakens the attention and helps cultivate concentration. When concentration is highly focused and undistracted, meditation follows. Remain in seated position and then move into the Camel. Ushtra-asana - The Camel Pose - Sit up on the knees with the heels of the feet pressed against the buttocks and the calves of the legs flat on the floor.
- Reaching backward, grasp the left ankle with the left hand and right ankle with the right hand.
- Inhale through the nostrils and lift the buttocks off the legs arching the back and thrusting the abdomen forward and tilt the head as far back as possible.
- Either hold the posture for the duration of the inhale breath or breath gently through the nostrils while holding the posture.
- Exhale and return to the kneeling position.
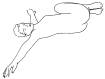
Comments: The ushtra-asana is a powerful posture for streatching the spine, back muscles, shoulders and arms. It is best to practice it later in your asana routine after most of the muscles are limber and and you have worked the back and shoulders. Durations/Repetitions: Hold the posture for the duration of the inhaled breath. If you choose to breath while holding the ushtra-asana, hold it for between thirty seconds to one minute. Repeat the posture three times. 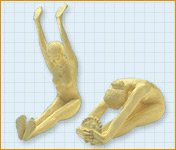 | Ugra or pascimottana-asana - The Noble or Powerful Pose Having stretched the feet on the ground, like a stick, and having grasped the toes of both feet with both hands, when one sits with the forehead resting on the thighs, it is called "Pascimo-tana-asana" (or "ugra-asana"). This Pascimo-tana carries air from the front to the back part of the body. It kindles gastric fire, reduces obesity and cures all diseases of men. |
- Sit on the floor with the legs together and extended straight out in front. Keep the back straight, shoulders level and head straight. Place the hands, palms down, flat on top of the thighs then inhale deeply.
- Exhale and extend the arms straight out in front, parallel with the floor with fingers pointed straight ahead and palms facing down.
- Inhale slowly while raising the arms over the head, keeping them straight, and bending as far back as is comfortable. Tilt the head back and look up at the hands.
- Exhale slowly bending forward at the waist and grasp the feet with the hands. Bring the head as close to the knees as possible, placing it on the knees if you can, keeping the legs straight. (If you are unable to grasp the feet then grasp the ankles).
- Hold that position for the duration of the exhale breath.
- Inhale slowly and return to the seated position described in step #1.
Comments: When the ugra-asana is properly performed, each vertabra of the spine and each muscle in the back are stretched. This type of stretching is highly beneficial. Try it regularly for a week and you will, without doubt, notice the benefits. The compression or contraction of the stomach followed by the release increases blood flow to the abdominal region and tones the muscles. Gas is release and sluggish digestion and/or constipation is improved. The muscles in the calves and thighs get a good stretching, helping to relieve fatigue and soreness in the lower extremities. Durations/Repetitions: Repeat this posture two or three times holding each repetition for the duration of the exhaled breath and take at least three deep breaths in-between each repetition. As you become more adept at doing the ugra-asana you may begin breathing slowly through the nostrils while holding the posture to increase its duration. At the end or the Noble Pose, pull one foot up to rest by the upper inner thigh (right foot to left thigh) and reach forward and stretch. Do the same with the left foot to the right thigh. 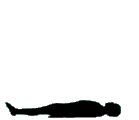 |  | The Shoulder-stand Pose - The Sarvanga Asana 'Sarva' means all and 'Anga' means body, so Sarvanga is the posture of the whole body. Start by lying flat on your back and raising your legs all the way over the shoulders. As the whole body weight in this posture rests on the shoulders, you can support your back and hips with your hands. It is a purifying, nourishing and energizing asana beneficial to the whole body. |
The Plow Pose - Hala-asana 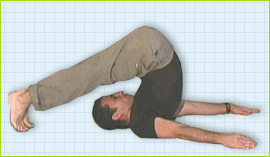 - Lie flat on the back in the shava-asana.
- Inhale through the nostrils. Place the palms face-down on the floor. Keeping the hips on the floor, bend the knees and bring them up toward the stomach while exhaling.
- Inhale, then while exhaling, raise the legs straight up perpendicular to the floor. You may support your hips with your hands or leave the arms flat on the floor, whichever is most comfortable.
- Exhale and continue to raise the legs over the head, bending at the waist, lifting the back and buttocks until the toes touch the floor directly in back of the head. Keep the feet together. If the lower back is supported by the hands try returning the arms flat to the floor with the palms facing down. If you are unable to comfortably place the arms on the floor continue to support the lower back with the hands.
- Keep the knees straight. Breath slowly through the nostrils and hold the posture for several minutes. If you cannot touch the floor with your toes hold them as close to the floor as possible and continue to exert effort to lower them.
- Reverse the steps to return to the shava-asana.
Comments: The benefits of this posture, like the sarvanga-asana, are numerous. All of the muscles and ligaments in the calves and thighs are stretched resulting in greater leg flexibility. People suffering from leg cramps will find great relief from the hala-asana. Since the abdominal area is contracted, blood compressed out of this area releases toxins and when the contraction is released the area is flooded with richly oxygenated blood. The contraction also helps to relieve gas and stimulates a sluggish digestive system. Similar effects take place as the neck and chest area is compressed effecting the throat, thyroid, parathyroid and lungs. Upper and lower back pain or discomfort is relieved due to the forward stretching of the spine. It is highly recommended that this posture be accompanied by the sarvanga-asana. In fact, many of the benefits of the sarvanga-asana apply to the hala-asana as well with the added benefits detailed above. The hala-asana is an excellent morning posture although some might find it more difficult then. During sleep the spine can become somewhat compressed resulting in the experience of tightness or stiffness in the back. A few repetitions of the hala-asana will quickly restore flexibility to the spine as well as promote alertness. Durations/Repetitions: Hold the hala-asana for as long as you are comfortable. 20-30 seconds is fine for early attempts, increase the time gradually as you become more comfortable. 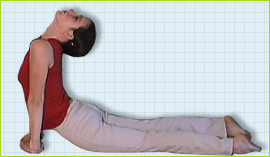 | Naga-asana - The Cobra Pose Let the body, from navel to toes, touch the ground, the palms placed upon the ground, and raise gently the upper part of the body (from navel to head) like a snake. This posture increases the gastric fire; it destroys all diseases and by constant practice leads to the awakening of Kundalini. |
- Lie on the stomach with the head turned to one side and the arms alongside the body with palms facing upward.
- Turn the head and place the chin on the floor. Inhale then exhale slowly through the nostrils and swing the arms around until the hands are placed just below the chin with the palms down and the finger tips of each hand almost touching and the elbows on the floor.
- Inhale slowly through the nostrils, press down on the hands and lift the torso from the waist up off the floor, arching the spine backwards and straightening the arms. Keep the hips on the floor.
- Tilt the head as far back as possible and hold the posture for the duration of the inhaled breath.
- Exhale and reverse the process to return to position #1.
Comments: If you find it uncomfortable holding the breath while the posture is held, breath gently through the nostrils. Some may find that they are able to arch the spine back even more than in the initial arch in step 3. In this case try "walking" the hands toward the pelvic region and stretching the head further back. In addition to the obvious benefits to the spine and lower back, the standard variation of the naga-asana strengthens the wrists and stretches the muscles in the chest. By maintaining a constant exertion to create a greater arch in the spine, the stomach and pelvic muscles are strengthened. Greater strength in these areas can be cultivated by performing the variation where the arms remain on the ground. B.K.S. Iyengar, a renowned expert in yoga-asanas, claims that displaced spinal discs can be placed back in their original position by practicing the naga-asana. Durations/Repetitions: Hold the posture for either the duration of a held inhaled breath or from one-half to three minutes. Repeat the naga-asana two to five times. 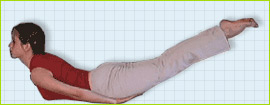 | The Locust or Grasshopper Posture : Shalabha-asana Lie on the ground with the face downwards and both hands under the chest touching the ground with the palms of the hands and both legs raised in the air ten inches high. This is called the Shalabha posture. |
- Lie on the stomach with the head turned to one side and the arms alongside the body with palms facing upward.
- Turn the head and place your chin on the floor. Slide your hands under your thighs, with the palms pressed gently against the top of your thighs.
- Inhale slowly and then raise the head, chest, and legs off the floor as high as possible. Tilt your head as far back as possible. Keep your feet, knees, and thighs pressed together.
- Starting at the top of the head and working your way down to the feet, bring your attention to each part of your body, consciously relaxing it before proceeding on to the next.
- Remain in the posture while holding the breath. You can support your legs by pressing the hands upward against your thighs.
- Hold the posture for as long as you can hold the inhaled breath then slowly return the legs, chest, and head to the floor while exhaling.
- Remove your hands from under your thighs and place the arms alongside your body. Turn your head to the side and rest.
Comments: The shalabha-asana has many benefits. Besides strengthening the muscles of the upper legs and lower back, it stimulates the stomach and intestines helping to relieve gastrointestinal gas, strengthens the bladder, and stretches the spine. To assist raising the legs as high as possible keep the back of the hands resting against the floor while pushing the legs upward with the fingers. As you get better at this posture and increase the strength of you legs you can raise the hands completely off the floor so your legs are raised unsupported. This increases the benefits of the shalabha-asana. Durations/Repetitions: Hold this posture for as long as you can hold the inhaled breath. Repeat the shalabha-asana three times. Note: Do the Bow pose right after the Cobra and Locust poses. Do these in order. The Bow Pose - Dhanura-asana 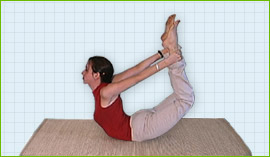 - Lie on the stomach with the head turned to one side and the arms alongside the body with palms facing upward.
- Turn the head and place the chin on the floor. Exhale, bend the knees, reach back with the arms and grasp the right ankle with the right hand and the left ankle with the left hand.
- While inhaling, slowly raise the legs by pulling the ankles up and raising the knees off the floor while simultaneously lifting the chest off the floor. Hold the inhale breath. The weight of the body should be resting on the abdomen.
- Tilt the head as far back as possible. Hold the posture as long as you can comfortably hold the inhale breath.
- Slowly exhale bringing the knees to the floor, release the ankles, slowly bring the legs and arms straight down on the floor and turn the head to one side, assuming the prone posture you began with.
Comments: The most obvious benefit of the dhanur-asana is that it restores flexibility to the spine. Regular practice will relieve lower back pain and release tension and strain in the upper back and neck area. The alternating stretching and releasing of the abdominal muscles increases blood flow to this area and aids all sorts of digestive disorders and discomforts. Strain or fatigue in the legs is also released after a few repetitions. Extended practice will help develop upper-body strength. Durations/Repetitions: The dhanur-asana is either held for the duration of the inhaled or between one and three minutes while breathing gently through the nostrils. Repeat it two or three times. Roll over flat on your back following this posture. The Bridge or Wheel Pose - Chakra-asana 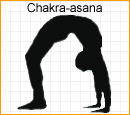 - Lie flat on the back in the shava-asana.
- While exhaling bend the knees and bring the feet as close to the buttocks as possible with the soles of the feet flat on the floor.
- Bend the arms at the elbows and place the palms of the hands flat on the floor directly under each shoulder with the fingers pointing toward the back.
- While inhaling slowly, begin to raise the head, back and buttocks off the floor while arching the spine. Continue to press downward on the hands and feet while raising the hips and stomach as high as possible.
- Hold for the duration of the held inhaled breath. When you can't hold the breath comfortable any longer, slowly exhale and return the back to the floor, slide the legs out straight returning to the shava-asana.
Comments: The chakra-asana is more challenging than most other yoga postures. Don't be discouraged if your unable to accomplish it right away. Even attempting this posture without successful completion holds great benefits. First and foremost is the strength and suppleness it restores to the spine. It strengthens the arms, shoulders and upper back as well and stimulates the cardiovascular system. The chakra-asana has an overall tonic effect for the entire body. As the natural suppleness of the spine is restored after a period of practice you can begin to perfect the form of this asana and thus experience greater benefits. First be certain that the arms are as straight as possible with very little to no bend in the elbows. When you can hold this comfortably, begin breathing through the nostrils while holding the posture and attempt to get a greater arch in the spine by bringing your hands closer to your feet and/or bringing your feet closer to your hands. Finally, you can extend the duration of the chakra-asana by doing several repetitions in sequence without resting in-between. As you return from the posture keep the hands behind the shoulders and the soles of the feet flat on the floor and as soon as the back returns to floor immediately raise it and enter the full posture again. Durations/Repetitions: The chakra-asana is either held for the duration of the inhaled breath or between one and three minutes while breathing gently through the nostrils. Repeat it two or three times. The "Bridge" Variation: Although this variation is much easier to perform than the full chakra-asana, it shares several of its benefits. In particular it will help to stretch the spine and relieve tightness in the upper back and shoulder area.To get the full benefit of the bridge variation continual effort should be applied to raising the back upward and creating the greatest possible arch with the spine. While holding the bridge breath slowly through the nostrils. If there is no discomfort felt in the spine or shoulders then one should advance to the full variation of the chakra-asana as described above. Both variations strengthen the back and promote flexibility of the spine. Tightness in the back and spine results from poor posture, stress, a sedentary lifestyle and/or emotional disturbances. You should begin to feel the tightness being released after just a few repetitions.  | The Half Spinal Twist Pose - Ardha-matsyendra-asana Keeping the abdominal region at ease like the back, bending the left leg, place it on the right thigh; then place on this the elbow of the right hand, and place the face on the palm of the right hand, and fix the gaize between the eye-brows. |
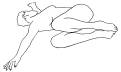
- Sit in any comfortable cross-legged position.
- Straighten the legs out in front. Bend the right knee and bring the heel of the right foot close to the left hip.
- Inhale and bend the left knee upward and place the left foot flat on the floor to the right of the right leg with the ankle touching the right thigh.
- While turning the spine to the left straighten the right arm bringing it around to the outside of the left knee and grasp the left foot with the right hand.
- Turn your head as far as possible to the left and bend the left arm behind your back. Keep your spine, neck and head aligned and continue to exert effort at turning to the left.
- Repeat the posture the other side by reversing directions 2-6.
Comments: The Half Spinal Twist is one of the best Yoga postures for cultivating flexibility and strength in the spine. It sooths stiff necks and upper back tension caused by stress, poor posture, or prolonged periods of sitting in one position. The alternating compression and release of the abdominal region flushes this area with blood and massages the internal organs. Muscles of the stomach and hips are also toned from repeated practice of the Half Spinal Twist. Durations/Repetitions: The posture can be held for as long as you are comfortable. (One repetition consists of performing the posture on each side. Two to three full repetitions should be done at each session. Now we are winding down:  |  | Stand erect with the head and body straight but relaxed. The feet are together, and knees are straight and the arms are relaxed at the sides. Inhale deeply and Exhale slowly bending forward, touch the ground keeping the hands parallel to the feet and head touching knees. By the time your hands touch the ground, you should complete exhaling. Retain the breathe and remain in the same position for about 6 to 8 seconds. If you cannot touch the ground, then let your hands go only as far as they can. |
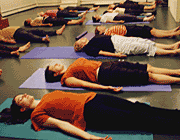 | Shava-asana - The Corpse Pose Lie on the ground with the face downwards and both hands under the chest touching the ground with the palms of the hands and both legs raised in the air ten inches high. This is called the Shalabha posture. |
- Lie flat on your back with your legs together but not touching, and your arms close to the body with the palms facing up.
- Keep your eyes gently closed with the facial muscles relaxed and breath deeply and slowly through the nostrils.
- Starting at the top of the head and working your way down to the feet, bring your attention to each part of your body, consciously relaxing it before proceeding on to the next.
- Remain in the shava-asana for between 3 and 5 minutes or longer. If you become sleepy while in the shava-asana begin to breath a bit faster and deeper.
Comments: While many consider this a simple posture at first, its simplicity eventually proves to be deceiving. The goal of the shava-asana is for the body and mind to be perfectly still and relaxed. Not only should the body be motionless and at ease, but the mind as well should be quiet, like the surface of a still lake. The result will be a deep and stable relaxation that will extend into your meditation or be felt through the activities of your daily circumstances. It goes without saying that the shava-asana will take some time to perfect. You will find the simple exercise of focusing your attention on each part of your body and consciously directing the breath there to be a great help with this posture.There are two common obstacles that can prevent you from fully benefitting from this posture: sleepiness and a restless mind. If find yourself getting drowsey while in the shava-asana increase the rate and depth of your breathing. If your mind is restless or wondering focus your attention on all of the bodily senations you're experiencing. Bring your mind to the sensation of the floor beneath you or on the rhythm of your breath. While practing your Yoga-asana routine you should always begin and end each session with the shava-asana. Durations/Repetitions: We recommend that you begin your period of yoga-asana practice with at least 3-5 minutes of shava-asana. Return to it periodically throught your posture session to relax and rejuvinate the body/mind and then conclude your session with at least 3-5 minutes more. END OF SET go to top
List of Asanas  | SURYA NAMASKAR: Surya Namaskar means greeting or bowing the sun. Usually all sessions of Yoga asanas begin with the 'Surya Namaskar' or sun salutation. It nourishes and energizes the upper part of the body. |
 | UTTHAN PADA ASANA (LEG LIFTING POSTURE): 'Utthan' means to raise up and 'Pada' means legs. In this posture the legs are lifted upwards. It strengthens the spinal code and removes disorders of the back. |
 | PASCHIMOTHAN ASANA (THE FORWARD BEND): Paschimothan Asana also known as touching toes posture, means stretching the back. It brings flexibility and corrects disorders of the spine. |
 | BHUJANGA ASANA (THE COBRA): 'Bhujanga' means serpent or snake. This asana is named after the king of the snakes, Cobra. It provides a youthful appearance and for women, makes child birth easy. |
 | SALABHA ASANA (THE LOCUST): 'Salabha' or locust is a type of grass hopper. It is a reverse of cobra posture. It is strenuous and can be practiced in parts at the initial stage. It favourably activates all the organs of the lower part of the body. |
 | SARVANGA ASANA (THE SHOULDER STAND): 'Sarva' means all and 'Anga' means body, so Sarvanga is the posture of the whole body. As the whole body weight in this posture rests on the shoulders, it is also called 'Shoulder Stand Posture'. It is a purifying, nourishing and energizing asana beneficial to the whole body. |
 | MATSYA ASANA (THE FISH POSTURE): Matsya Asana is so called because in its perfect posture, one is supposed to float like a fish in water. It is beneficial to perform this asana after Sarvanga Asana. It has corrective effects for the neck and shoulder troubles. |
 | DHANUR ASANA (THE BOW POSTURE): The body form in this asana resembles a bow or 'dhanur'. It is one of the best asana for activating and strengthening the joints of the body. It has some special benefits for women. |
 | SHAVA ASANA (RELAXATION POSTURE): 'Shava Asana' means posture of a dead body. Also known as 'Yoga Nidra' which means yogic method of sleep. It is an asana which claims to provide a satisfactory relaxation of both the body and the mind. |
HALA ASANA - (THE PLOUGH POSTURE): Hala Asana or The Plough Posture is a valuable asana as it has some unique qualities and excellent benefits. It is an extreme forward bending exercise which promotes strength and flexibility in all the regions of the back and neck. It can be performed in two ways; the only difference is in the position of the hands. Beginners can practice the easier one which is explained in method 1. Method 1 | 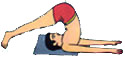 |
- Lie flat on the back with your body straight and stretched out. Bring the heels and toes together. Put the palms on the floor and keep them close to the body on both sides.
- Stretch out the legs and toes. Inhale and simultaneously raise both heads upwards till they come to a vertical position.
- Exhale and simultaneously start lowering the legs towards the head area. Try to touch the floor in front of the head with the toes. Go only as far as possible for you. After exhaling, keep breathing normally till the whole posture is completed. Remain in this position for about 8 seconds.
- Start returning the back to the floor. Let the back roll down on the floor inch by inch. This should be done very slowly and smoothly. Keep the legs and toes quite tight all along during the returning phase. Now you have completed one round of this posture and relax for 6 to 8 seconds.
Method 2 | |
- Lie flat on the back with your body straight and stretched out. Bring the heels and toes together. Put the palms on the floor and keep them close to the body on both sides. Stretch out the legs and toes.
- Inhale and raise both the hands upwards in a parallel way. Take the hands backward with the back of the palms on the floor. Finish inhaling at the time the hands have touched the floor. Exhale.
- Inhale and simultaneously lift both the legs upwards to a vertical position.
- Exhale and simultaneously lower the legs towards the floor in front of the head and above the hands. Put your toes on the floor. If you cannot touch the floor with the toes, go only as far as possible. Breathe normally. Now you are in plough posture. In this position, your legs should remain straight and close to one another. Do not bend the knees and the arms, hands and palms should be parallel to one another. Remain in this position for about 10 seconds.
- The returning process should be done very gradually and in a controlled way. First return only the legs, let the hands remain on the floor. While returning the legs, let the shoulders roll back first and then the flanks, small of the backs, hip and lastly the thighs, legs and heels inch by inch. When the heels have touched the floor, lift both hands up and return them in a parallel way to the floor. Put the palms on the floor. Now you have completed one round of the best form of the plough posture. Relax for 6 to 8 seconds.
Restrictions: Start with one round on the first day and gradually increase to a maximum of four rounds. Relax for sometime between the rounds. If the toes do not comfortably reach the floor, keep the hand on the back supporting the back muscles until they become more flexible. Major Benefits: Energizes and nourishes the sexual glands and brings strength and vitality to them. It has medicinal effect for impotency and frigidity. Exercises every inch of backbone and surpasses all other asana to bring flexibility to the spine. Reduces excess weight without weakening the body. Improves the blood circulation and nourishes many of the essential internal organs. Regular practice of this asana maintains inner balance and helps to develop mental and physical poise. go to top |